We all know - manicure is of great importance increating an image. No self-respecting girl will go out on the street with groomed hands. Broken nails and peeling varnish cause even greater dislike than, say, ineptly applied cosmetics. Due to the circumstances, not every woman manages to allocate time to visit the beauty salon and relax, while an experienced master will put the nails in order. But do not leave your hands without manicure because of this? No time? So you need to learn how to look after yourself on your own. Especially in this there is nothing complicated. Every girl who at least once held a nail file and nail polish can make a simple manicure. In this article, we'll talk about how to bring your pens in order in just half an hour. And, most importantly, how not to make mistakes, often leading to negative consequences.

Rules of simple manicure
So, so that the nails do not break and do not separate, do not look dull and thinned, you must follow several rules. First, prepare the necessary tools:
- Several nail files with different granularity. Never use metal nail files! Get this tool in a store that sells professional products for manicure. Yes, it costs an order of magnitude more, but no money can equal the health of nails;
- Cutters or scissors;
- Cuticle oil and orange stick for its removal;
- Oil with vitamins;
- Sea salt;
- Base base for lacquer, self lacquer and fixer;
- Liquid for removing varnish without acetone, cotton wheels;
- Pencil-proofreader. You will need it if the lacquer does not lie too gently.
Now you can proceed directly to the process:
- First, wash your hands well with soap and water. Use only warm water, because the cold skin begins to peel and become inflamed;
- Now take the cotton pad and remove the leftoversold cover. No need to rub with force - just press the cotton wool to the nail for a few seconds, so that the product is absorbed into the lacquer. So he will take off without the slightest effort;
- If you want to shorten your nails a little,use a wire cutter. To give the finger a neat shape, try to mentally draw a line that runs right in the middle of the nail plate (from the base to the edge). Cropping, try to make the nail look the same on both sides of the imaginary line;
- Now take the nail file and attach the desired nailshape. Try to ensure that your movements are directed only in one direction: from the edge to the middle for the oval shape and from left to right for the square. The grain size of the nail file, depending on how much you cut off the nail. The thinner the edge, the less granularity;
- In order to get rid of small defects innail plate, polish it with a nail file with the finest granularity. This procedure can be performed no more often than once in 4-5 months, otherwise you will weaken the nail - it will become thin and brittle;
- Further water procedures. Prepare a warm bath with sea salt. If you like essential oils, you can add a couple of drops. We keep hands in water for 5-7 minutes, then we soak each finger with a napkin;
- Take an orange stick and carefully push it aside.cuticle to the edge. Do not cut it! The more often you remove it, the stronger it will grow. To slow the growth of the cuticle, use a special oil;
- If you have burrs around the nail, take the tweezers and cut them. To pull back the skin is not necessary, just tightly press the tool against the skin and try to cut the burr "under the root";
- Now we lubricate the nail and the skin around it with oil containing soothing ingredients and vitamins. We wait for about ten minutes, until the oil is absorbed;
- We rinse our hands with running water, wipe them, apply them with a nourishing cream;
- Again, take the liquid for removing the varnish and treat it every nail to degrease;
- We put the base under the varnish, we wait for complete drying;
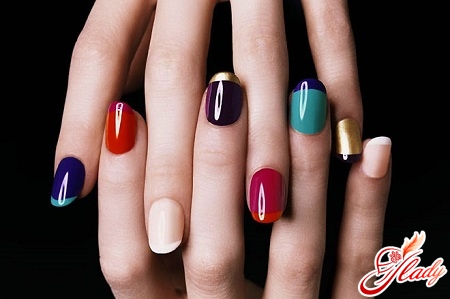
- We take a covering of a pastel shade and proceed toapplication. In order for the varnish to lie flat, it is necessary to carefully remove its excess from the edge of the bottle, then press the brush to the edge of the nail so that it lies "fan." Without lifting the brushes, lower it to the base, and then start to move upward, trying to evenly distribute the varnish on the surface;
- If you have stained the skin around the nail, use a special corrector. Dip it into the nail polish remover and remove all "bloopers";
- When the varnish is completely dry, apply a fixing coating.
That's all - neat and beautiful manicure is ready! And make it simple - the main thing is not to get distracted and follow the instructions. 
Stylish design of nails
We looked at the most common nail design. Yes, it is in many respects good: it is done quickly, it looks neat and suitable for any outfit. But sometimes you want something special and even creative. So why not try it?
- Leopard print
Such a picture does not go out of fashion for severalseasons. Leopard dresses left in the background - immediately appeared handbags, neck scarves and belts. The girls who follow the trendy directions, in the wardrobe always have things with a "wild" pattern. Learning to make a leopard manicure, you elegantly complement the image in which there are accessories with a similar print.
Remember - a leopard manicure looks effective only if it complements a handbag, scarf or figure on boots. But with a dress of the same color, it looks too vulgar.
- Berry nails
This figure is subject to even those girls,who just started to master the technique of drawing. Is it raining and slush outside? The strawberry on the nails will certainly cheer you up! By the way, berry manicure is ideal for short nails.
Strawberry is a great solution for a party and a romantic walk.
- Legs shod in sneakers
In the case of this type of design, theimmense space for imagination. You can use any colors, any type of lacing, various ornaments. We will consider a classic black and white version.
Believe me, there is nothing complicated in drawing on nails. Having mastered this procedure, you can surprise people around with a stylish manicure as often as you want. We advise you to read: