Orchids have long subdued the hearts of the majorityflower growers. They are very beautiful, therefore serve as an excellent living decor of any room. In addition, the varieties developed specifically for growth at home are quite unpretentious in care, but endowed with a continuous flowering function. Yes, and buy such an exotic and at the same time patient plant in recent years is quite simple, because the price of a particularly popular form of it - phalaenopsis - is quite acceptable. But sooner or later, any flower needs a transplant, and it is with this that most difficulties for inexperienced owners are associated. In nature, all epiphytes (namely, orchids) have unlimited space for development: they grow and grow. Indeed, there is enough space for the roots, the soil is renewed naturally, so why change anything? But those of their relatives, who are brought out specifically for life and flowering at home, are some kind of captive: they are "imprisoned" in special pots. Therefore, sooner or later, the owners are faced with the task of transplanting an orchid, which has outgrown its former "home". And in any case, the soil should be changed periodically. It is with the ripening of the need for such a procedure that most inexperienced growers immediately have many questions. "When do I need to update the substrate? Is it possible to transfer to a new pot epiphyte during flowering or is it better to do this after the buds fall? What signs indicate that it is time to transplant the orchid? "- these and other nuances require detailed consideration. Indeed, the approach to solving the problem of moving your exotic blossoming beauty into a vase with a new substrate is not just "smart". Unlike other houseplants, transplanting orchids should be tailored to certain characteristics. According to connoisseurs, there are a number of limitations when a plant is not desirable to undergo such stress, for example, during active development of the root system or at the time of flowering. But since even in these cases, sometimes there is a need for taking emergency measures, then you need to know some nuances. Therefore, we suggest that you familiarize yourself with the general rules and stages of the procedure for transferring your extraordinary blooming beauty to a new and more spacious vase. So, how to transplant an orchid, bred for existence at home?
General Transplant Rules
As you know, any substrate has its timeuseful existence. After three to five years, the mixture from the bark is more and more inferior to moisture, it loses the ability to "breathe", compresses and accumulates salts coming from the watering water. The substrate from the moss requires an annual replacement, and every couple of years it is necessary to update the soil compositions that include expanded clay. But it is often impossible to transfer orchids from one pot to another. The optimal time interval between these processes is two to three years. But the young plants of the most common phalaenopsis in the period of their main growth can be moved to a new substrate every six to eight months. Signal to the next migration can serve not only a strong expansion of the flower, but the complete decomposition of the substrate. In addition, due to deficiencies in care, improper irrigation or the occurrence of diseases, the roots of an exotic plant may begin to rot. Then it is necessary to transfer the orchid to a new substrate as quickly as possible in order to save emergency from death. Transplant epiphytes are allowed all year round, but only before the beginning of the root activity and before the time of active flowering has come. For most orchids, this time occurs in the spring or early summer. Therefore, transfer them to a new pot you need either in early March, or with the onset of September. The beginning of active root growth can be determined by the appearance of a new germ (sympodial epiphytes) or the first leaf (monopodial epiphytes). It is also not advisable to transplant the plant during the flowering period. This is due to the fact that adaptation in the conditions of a new substrate and simultaneous formation of buds select very many forces from the epiphyte, which can lead to its death. If you are still thinking about how to transplant an orchid, and the above-mentioned time of development of its lower part or flowering has already come, you should wait for a sufficient growth of young roots (centimeters to five or seven) or the fall of the petals. And it is better to postpone the process altogether and tackle it after the active growth of the root system, or choose a time when there will be a break in the flowering process, if there is no urgent need for resettlement. In phalaenopsis, which, with proper care at home, has the ability to decorate your window sill with brightly blown buds almost all year round, it is recommended that the flower bud be cut after falling off the petals, leaving two or three buds so that all the plant's strength can be thrown on the rooting in a new substrate. In the process of transferring an exotic beauty to a new pot, remember its fragility and carry out all manipulations exceptionally accurately and carefully. 
Preparation for transplantation
Before you transplant an orchid, you need tosome preliminary training. First, choose a suitable pot, whose diameter should be two centimeters more than the old one. It is better to take a pot transparent, since the roots of an orchid need an unobstructed acquisition of ultraviolet for the process of photosynthesis. Stop your choice on plastic or glass containers, pay attention to the mandatory presence in it of special drainage holes. In addition, prepare a long sharp knife or garden scissors, a wooden stick and a special substrate. For the phalaenopsis orchid, you can take a tree bark (better pine), and if you use the prepared soil mixture for epiphytes, then select from it only the necessary pieces of bark and sphagnum. The substrate in the old pot should be well moistened by pouring in warm water for half an hour before extracting the flower. This will help to easily separate the roots from the pot walls and save time for transplant. If the old clay pot, then, most likely, you will have to use a stick to gently tear off the stuck shoots. If it is also porous from the inside, then they will probably have to sacrifice the state of the flower: it is almost impossible to carefully separate the roots from such walls. Prepare a new container in which you plan to transplant an orchid. First of all, drainage in the form of expanded clay, pebbles or polystyrene beads should be placed on the bottom. Also suitable is ordinary river sand. If you use materials obtained by you on the street, they must be disinfected, boiling in water. Do not neglect this security measure, because any problems are easier to prevent than to be lost in guesses, why is this suddenly the plant died. If none of the water-discharging materials described above was at hand during the transplantation (this is not very good, but it is permissible), then a pot on a quarter of the height must be filled with a fresh substrate. Although drainage elements for epiphytic plants are often a vital necessity: firstly, they prolong the life of special soil mixtures, and secondly, they perfectly drain moisture, preventing rotting of the root system. Therefore, it is better to carefully prepare in advance and stock up all the necessary materials, tools and containers.
Extracting a flower from an old pot
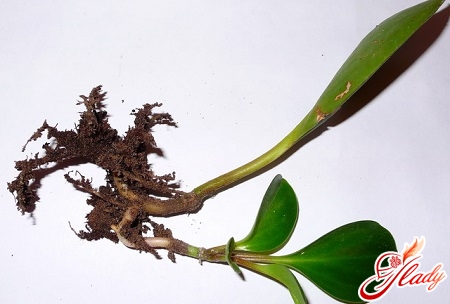
To transplant any orchids we begin with thisprocedures. The pot must be kneaded from all sides (if it is hard, then "tap"). If during the lifetime of the epiphyte in it the roots have grown to the walls of the flowerpot, then the wooden stick must be carefully passed along its inner side, separating the earthen lump. I must say that sometimes such measures do not help, so you have to break a glass or ceramic pot, and plastic is better to simply cut. During the next stage, remove the old substrate from the roots, and then gently straighten them and carefully clean the remains of the soil with your fingers. If the roots are strongly intertwined, then after removal from the old pot, it is best to wash them with lukewarm water from the shower. This simple procedure will prevent their damage and breakdown, allowing you to easily clean the lumps of the old substrate. Some growers recommend, on the contrary, to leave a little of the previous soil mixture on the root system of epiphytic plants when transplanted into an updated soil. It is especially useful to do this for orchids that are in the period of active flowering. This technique will allow your exot to adapt more quickly to the new flowerpot, spending less energy on it. But to retain a little of the previous substrate should be only if the roots of the plant are healthy, and he himself has no signs of mold. Otherwise, this should not be done, since there is no need to transfer the old problems to a new location. With the root system already cleaned, the disinfected instrument must be cut off all dead parts: rotten, hollow or soft. By the way, in phalaenopsis, dry shoots can not be removed. After that, put orchid in a container of water for about ten minutes. During this time, possible pests that have settled on the roots will die. And at the end of the seizure phase, all root sections must be thoroughly treated with coal powder, sulfur or cinnamon. Such disinfection measures will help to protect the plant from decay and other spoilage. 
Transplant into a new pot
Here and waited for your beautiful orchid of that hour,when it was time to transplant it into a new container and with relief to complete this long procedure of resettlement. It is necessary to take a pre-prepared pot and carefully, without pressing the roots to the bottom, put a plant in it. After this, keeping the flower almost on weight, you should gradually fill the container with a substrate (for transplanting orchids of the phalaenopsis genus, the bark is used). Pour the soil mixture evenly, sealing it not by pressing on the ground, but tapping on the walls of the pot. The substrate between the roots can be gently pressed with a wooden stick. Only do it carefully so as not to damage the plant. If the long roots are not placed in the pot, it is better to leave them on the surface: let them hang from the edges and absorb moisture from the air. Do not forget to strengthen the stalk of the plant with a special stick and clamp. Remember that for an orchid transplantation will become a real stress, especially if it happened during the flowering period. Therefore, it is necessary to give the epiphytic time to rest and settle in a new pot. Do not water the flower for the first five days, but daily sprinkle it with warm water. It is best to put an exotic beauty in a slightly shaded place with high humidity for a couple of weeks. And do not rush to fertilize it: the first top dressing is best done only in a month. Although it is not forbidden to carry out the procedure for replenishing the upper part of the orchid. The fact that the transplantation of an orchid is carried out taking into account all the basic requirements and your exotic beauty has not suffered, can be judged by the time of the onset of the next flowering. If you strictly adhered to the algorithm described above, then the new buds should please you with their appearance already this year. But do not rush to panic if this does not happen. Carefully look at the orchid: if the plant has an apparently healthy appearance, the roots and leaves are not damaged, the dry and rotten parts are missing, please be patient and wait a little longer. Probably, the flowering process is delayed due to the fact that the epiphyte has not yet accumulated enough strength for this. As you can see, the question of how correctly to transplant an orchid of the phalaenopsis species and other less common her relatives is being solved quite simply even for florists-beginners. Therefore, if you are still hesitating and wondering whether you need to do this, although all the signs indicate an urgent need, be bolder. It is enough only to fit into the time when the plant is maximally ready for migration to a new substrate and adaptation in it, follow the recommendations described above and handle exotic epiphytes carefully. And then your orchid will always look like a pretty beauty, delighting the owner with a continuous flowering process, a healthy look and longevity. We advise you to read: