 If you are just starting to master the techniquepatchwork sewing, it is advisable to start with simple but large items. It is best to use cotton fabrics for work. Therefore, we suggest you sew a patchwork blanket from quick squares. By the way, having mastered this particular method of patchwork sewing, you will be able to easily and quickly make not only blankets, bedspreads or plaids, but also smaller items (pillows, potholders, etc.)
Preparation for work
First of all, you need to decide onthe size of the blanket and its color scheme. Of course, it is desirable to use fabrics of matching colors, but for practice you can take any scraps. And for this blanket we will need scraps, because we will sew it from long strips of fabric, which we will “turn” into patchwork squares. In addition, we will need a piece of fabric (according to the size of the blanket) for the back of the blanket and a piece of padding polyester of the same size, as well as fabric for edging. So, for a patchwork blanket, we prepare chintz of three different colors, scissors, threads, a pencil, a square ruler (or a square template) and a sewing machine. If you are not yet a master of handling a sewing machine, then also prepare pins or a thread with a needle for basting the parts. The prepared chintz should first be soaked in hot water for about ten to fifteen minutes, and then rinsed thoroughly in clean water. It would be a good idea to starch the fabric. To do this, dilute the starch in cold water (a tablespoon of starch per glass of water), boil two liters of water in a separate saucepan, pour the starch solution into the boiling water and immediately remove the saucepan from the heat. When the water cools down a little, rinse the chintz in it and leave to dry, hanging the fabric on a rope or on a crossbar. Iron the still damp chintz with a hot iron along the grain, and to prevent the fabric from sticking to the iron, iron it through dry gauze or thin cotton fabric. That's all, actually. We have prepared the fabric, and now we will begin to create those very quick squares from which we will sew a patchwork blanket. By the way, a master class on making quick squares in exactly this way was presented by artist Elena Folomieva at the Gatchina Festival 2010.
Making quick squares
To begin, take two fabrics of different colors andwe cut out two strips of equal width from them. Then we fold the strips with the wrong sides together, sew them together and iron the seam well. After that, we measure the width of the resulting piece and cut out a third strip (from the third cut) of the same width plus seam allowances. We fold this strip with the first piece with the right sides together and sew it together again on both sides. As a result, we get a two-sided “sleeve” – one side of two stitched strips, the other of one whole strip. After that, we lay out our calico sleeve on the table and cut out squares from it. To do this, we place a square ruler on the fabric, turning the square with the corner down and aligning its extreme (diagonally) corners with the bottom seam line. We cut off part of the strip along the right side of the ruler (at an angle across the fabric strip, from right to left). We move the ruler to the left and up, aligning its extreme corners with the top stitch line. In this case, the right corner of the ruler should lie at the intersection of the previous cut line with the seam line. Again, make a cut along the left side of the square from left to right. Again, move it down, align, cut, again - up, align, cut. And thus, cut two-sided triangles from the sleeve. Having unfolded the triangles, you will see that you have patchwork squares of two types, sewn from three different fabrics. These are the squares that we will fold to make our patchwork blanket.
Connection of squares
For making patchwork itemsvarious patterns are used. The squares that we have will allow us to create a pattern in the form of diamonds, zigzags, triangles or scales. Try different options, laying out our quick squares and choosing the pattern that you like best and that matches your idea of a patchwork blanket. Having chosen a pattern, you can start sewing the squares. First, we sew longitudinal stripes from the squares (along the width of one square) and iron the seams. Then we sew the finished strips one by one into a whole piece and again iron the seams well. The front side of the blanket is ready!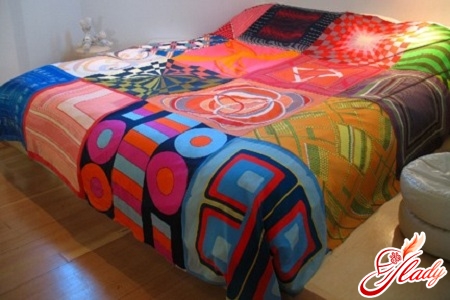
Making a blanket
For our patchwork blanket we useany suitable fabric that will become its back side. But it is best to take a piece of chintz, cambric or staple for this. Now lay out a piece of lining fabric on the table face down, put the padding polyester on it, and lay the patchwork fabric on top (face up). After that, baste or pin all the parts together and quilt the blanket on a sewing machine: you can do it along the edges of the squares, or along the edges of the resulting pattern. All that remains is to cut out the edging. For it, cut a strip eight centimeters wide and a little longer than one side of the blanket from a piece of fabric. Fold the edging in half (lengthwise), iron it, apply it to the front side of the blanket, aligning the open cut of the edging with the edge of the blanket, and stitch it. Next, fold the free edges (extending beyond the blanket) of the edging to its back side, fold the edging to the back side of the blanket and stitch it on the front side, making a stitch along the patchwork fabric. We also trim the other sides of the blanket. However, for the edging, you can use regular piping or trim the blanket in a patchwork style in any way convenient for you. For example, you can stitch a strip for the edging from the remains of all three fabrics used for the quick squares. You can take only one of these fabrics for the trim, or you can make the edging from any other fabric. By the way, for a baby blanket, you can sew on ruffles as an edging. But all this already depends on your taste, your ability to handle a needle and thread, your mood and imagination. Have a good start! We recommend reading:


