 "Ribbons, pins, needles, braid - everything todrive a gentleman crazy. Lace, hairpins, lipstick – everything a mistress needs”. Surely everyone remembers this song from a popular film. And where do the fair sex keep all these accessories? Of course, in a box. These mini-chests for jewelry have always been and will be popular among women. By the way, you can put not only rings, earrings, bracelets and brooches in them. Boxes are also used to store buttons, yarn, beads, rhinestones. In general, everything that is so necessary for a woman who is fond of needlework. And if you are a creative person, then you simply cannot do without such a useful item. Needlewoman. This word means only one thing – a lover of making something with her own hands. Beads for yourself, a doll for a child, warm socks for a husband, flowers to decorate the house. So why not make a box yourself? Moreover, you won’t need a lot of effort, money or any special gift for this. The accessory that will be discussed in this article is suitable for storing both jewelry and various necessary little things. So how to make a box with your own hands? Let’s consider this issue in all details.
What is needed?
- Sticks for manicure
- Acrylic white paint
- PVA glue
- Box of dense cardboard
- Paint brushes
- Eggshell
- Paper napkin with any picture
- And of course, a little patience
Operating procedure
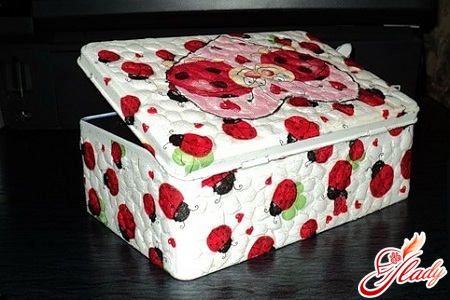
We take a cardboard box with a lid.You can choose any size - it depends on how you will use the finished product. If you are thinking about how to make a jewelry box with your own hands, then you can choose an iron box, for example. But if you are going to store yarn and other knitting accessories in it - choose a larger blank. So, the choice of the box is made. Now, using sandpaper, we process our cardboard blank from all sides. Both inside and outside. You need to use two types of "sandpaper", first large, and then small. So that the surface is perfectly smooth. Next, apply a small amount of glue to a separate section of cardboard, take half or a third of the eggshell, apply it, and press with a stick so that it disintegrates into even smaller pieces. With the same stick, only the sharp end, distribute the shell, forming an ornament along the perimeter of the box. You can lay out a solid pattern, or you can make "islands" of shells. There is room for imagination here! When the pattern is ready, it needs to be fixed with glue. To do this, we treat the entire surface of the box with it. Now we wait for the shell mosaic to dry. Next, take white paint, acrylic is best, since it will hide the natural color of the shell well, and completely paint our future box. Again, we wait for it to dry. And here it is, the most important and difficult moment - gluing a paper napkin. Usually paper napkins consist of three layers, so you need to separate them. The choice of napkins is huge, so you can easily choose the right color and pattern. Again, cover the entire surface of the box with glue, take a part of the napkin and put it on the selected area. And now the most difficult part. You need to coat the napkin with PVA as quickly as possible using a small brush. This is necessary to prevent the paper from shrinking and to release air from underneath it. Repeat the procedure until the entire surface is covered with a napkin. Well, that's it! The original accessory from a cardboard box is ready. Now it remains to fill it with trinkets dear to the heart. Or maybe this box is destined to keep many secrets that will be solved by the skillful hands of the craftswoman? Bead by bead, thread by thread - this is how real works of art are born! We recommend reading:


