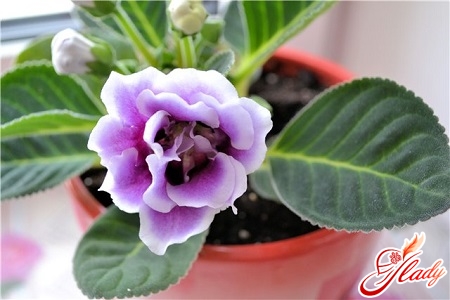
 Gloxinia - a blooming beauty native to Brazil. In Europe, it came in the XIX century and was named after the German botanist and doctor Benjamin Peter Gloxin. Gloxinia has tuberous roots and bell-shaped flowers. Bells rise on long peduncles. Especially beautiful are flowers that have a mahr texture. By the way, the name of the flower is very similar to the German word "Glocke" (bell). Bright double flowers cause involuntary admiration. There is an opinion that the plant dies immediately after flowering, but with proper care this does not happen. And gloxinia can bloom both with natural and artificial lighting. As for the cultivation of the flower, there are several ways: growing from the tubers and multiplying by seeds. Gloxinia from seeds is a laborious process, but the result is worth it. So, below we will talk about the multiplication of the plant and try to describe in detail the entire algorithm of work.
Growing gloxinia from seeds
So how correctly to plant and grow thisa tropical beauty? As for gloxinia from seeds, everything depends on the growing conditions here. First of all, of course, from lighting and temperature. Before you plant seeds, determine the temperature in the room using a room thermometer. It should be at least 20 degrees. For additional illumination it is possible to use fluorescent lamps. They allow the seedlings to ascend at any time of year with minimal illumination. Reproduction by seeds has its own peculiarities: shoots appear only under sufficient illumination. Therefore, it is recommended to sow them on the soil surface, if possible, lightly sprinkling the soil. For sowing, you can use ordinary soil, the one used for adult plants. But there is one important point: the soil particles should be as small as possible. Before filling the container with earth, it is necessary to sift it beforehand, and then compact it. Thus, the soil will be porous on one side and dense on the other, allowing the seeds to remain on the surface and receive the required amount of light. The soil must be moistened before sowing. So that the land does not settle, you can do it with an atomizer. After the seeds are planted, cover them with a transparent film to create a greenhouse effect. As mentioned above, in order for the seedlings to rise, they need a sufficient amount of light. Therefore, the resulting greenhouse must be placed either on a rack, lit by a special lamp, or on a light window sill. Do not forget to check the air temperature in the room, where there is a container with seedlings - it must be at least 20 degrees, and, if possible, even higher. Growing gloxinia from seeds means permanent moistening of the soil from the spray. Spraying should be shallow, for this, when watering, keep the spray gun as far from the soil as possible. Excessive moistening can lead to the fact that the seeds on the surface simply settle into the ground, and this, of course, is undesirable. If you planted seeds in a fairly hot season, then the soil can dry up quickly. To avoid drying out, you must constantly monitor the condition of the soil and, if necessary, additionally moisten it. If you did everything right, the shoots will appear already 6-7 days after sowing. Now the seedlings need daily ventilation. Let's say you sprayed in the morning, then - in the evening, open the greenhouse for 2-3 minutes, so that fresh air enters the container. After about a week, the ventilation time can be increased to 5-6 minutes. And starting from the third week, it is necessary to open the greenhouse for 15-20 minutes. The irrigation algorithm changes from the third week. Now shoots should not be sprayed, but watered with a drop method. Water is introduced under the roots of plants with a syringe (the needle must be removed). Soil must always be wet! This rule is the most important in the cultivation of gloxinia. A month after sowing, the film is removed completely, while glossing from the seeds is observed in the previous regime. However, now you can not inject water from the syringe (you will agree, it is quite long, and it is dangerous for the roots of young plants), but simply put a container of flowers in a pallet with water for 15-20 minutes. Water that has not absorbed during this time, it is necessary to drain. The next watering to produce as the land dries up. After about 2 weeks, the grown seedlings must be planted, since they are already crowded in the same container. Prepare several containers and dive the seedlings in them so that the distance between them is 5-6 centimeters. A month later, young gloxinia can be "settled" on individual pots. Choose small containers - no more than 11 centimeters in diameter. That's all, now it's time to wait for flowering. Buds will appear in 5-6 months. The next year, when the gloxinia tubers are fully consolidated, they make one more transplant. Potty choose a little more - 13-14 centimeters in diameter. 
Growing gloxinia from tubers
If you decide that multiplying by seeds is not foryou, you can do easier and grow gloxinium from the purchased tubers. It is recommended to buy them in February-March. When choosing a tuber, carefully examine it - it should not be rotten or wrinkled. The size of the tuber also matters, because the larger it is, the more nutrients it contains, which provides a gloxinous abundant flowering. When planting a tuber it is important not to confuse the lower and upper parts. The upper part has a concave shape. Sometimes it can distinguish kidneys that look like irregularities or tubercles. Of these, leaves will subsequently flow. The lower part of the tuber is smooth and more convex. Before you start planting the tuber, you must rinse it with cool water. In order to avoid possible infection of the flower, place the tuber in a strong solution of potassium permanganate for 20-30 minutes. For planting, a ready-made substrate is used. At the bottom of the pot is poured drainage (expanded clay) and only after that add ground. Tuber should be planted with a convex side down level with the soil or a little bit of it. Then the tuber is gently pricked with earth. After planting the soil must be moistened. Act very carefully - the water should not get on the tuber itself, otherwise it can lead to its rotting. It is best to do watering from the bottom, that is, to a pallet. After this, the pot with the plant is placed in a well-lit warm place. The first shoots will not keep you waiting and will appear just one month after planting.
Care for gloxinia
Well, here you have grown gloxinia. Now you need to talk about caring for her. In principle, there is nothing complicated in it, but there are some nuances. We will describe them below.
- Watering and top dressing
Watering the plant should be carefully, follow,so that the water does not fall on the flower itself. It is recommended to use warm water. Do not water the plant with water from the tap! So you will destroy the flower. Do not allow the land to dry completely - water as necessary. From April to August, the soil can be fed. Fertilizers are introduced once a week. In summer, always maintain the desired humidity in the room. For this, once in 2-3 days, spray the air around the flower from the spray gun, trying not to fall on the leaves. Humidity should be between 70% and 80%.
- Accommodation
Very carefully it is necessary to treatthe selection of a place for your flower. You need to place gloxinium in such a way that direct sunlight does not reach it, as this can lead to burn of leaves. The best option is to put the pot on the window sill of the west or east window. Here the plant will receive the right amount of light. The air temperature should be 20-22 degrees in summer and 10-14 degrees in winter. It should be remembered that gloxinia is very sensitive to changes in temperature and drafts.
- Diseases and pests
No plant is immune to disease. And gloxinia is no exception. Especially it is prone to invasion of various types of ticks. For the prevention of this disease it is necessary to process the plant with phytoverm (you can buy it in a specialized store). It is necessary to dilute the drug according to the instructions and spray the flower. The procedure should be repeated 2-3 times at intervals of a week.
- The rest period
With the onset of autumn, or rather, October,gloxinia begins a period of rest. At this time, it is worth shortening watering and putting the pot in a dark and cool place with a temperature of 10-12 degrees: a verandah or a glazed balcony is suitable. "Sleeping" gloxinia is recommended to water once every 3-4 weeks. Proceeding from the foregoing, it can be noted that neither the reproduction of gloxinia, nor the care of it is particularly difficult. All these procedures are in force even for a beginner floriculturist. A little patience, and blossoming gloxinia will please you with its beauty very very soon! We advise you to read:


