Design: Lara Khametova. Photo: Dmitry Korolko, Ivan Frolov.  Decoupage tray Materials:a photo of a person in profile, tracing paper, black and white paper, a plastic tray, PVA glue, acrylic lacquer. Tools: composter for decorating the Fiskars edge, composter for decorating Fiskars corner, white pencil, mock-up knife. Work description: 1. Place a photo of a person in profile in front of you, cover it with a sheet of tracing paper and circle the profile with a pen or pencil. 2. Cut an image from a sheet of tracing paper with small scissors and, using a white pencil (you can take a piece of chalk or a piece of soap), transfer it onto black paper as accurately as possible. Cut out the silhouette. For this, it is better to use not scissors, but a mock-up knife. 3. Lay the silhouette on a piece of paper and draw an oval frame around it. Cut the oval out of paper - this is the basis of the future frame. 4. Transfer the frame outline to a black sheet of paper. Draw another line at a distance of 5 mm from the outside made - you get the outer side of the frame. Make the inside of the picture in the form of curls on top and bottom. Cut out the frame with a breadboard knife. 5. Using a special composter, punch the edge of a sheet of black paper. Cut the edge to make a strip. 6. Glue the bottom of the tray with a sheet of white paper (you can use PVA glue, slightly diluting it with water). Center the silhouette and the oval frame, and at the edges - black tracery. Glue the details. 7. Cut out black rectangles from black paper. Decorate each corner with the Fiskars composter. 8. Round the corners, make squares from the rectangles and paste them on the tray. When the glue is completely dry, cover the bottom of the tray with 2-3 layers of acrylic lacquer, allowing each layer to dry. Such a tray can be wiped with a damp cloth.
  1
1 2
2 3
3 4
4 5
5 6
6 7
7 8KstatiDetails, cut from black paper,well decorate the finished fixtures. It is not necessary to use only photos of people, try to use photos of pets. Also, the image of any object that does not look very well in the picture can be turned into an original silhouette. For work fit lamp with a conventional white or cream shade. The shape of the lampshade is not fundamental. Using the idea of a master class, transfer images to paper and cut them. Attach the finished parts from the inside to the lampshade using double-sided tape or “put” them on the glue. When you turn on the light, elegant silhouettes will appear on the lampshade. You can also decorate a large candlestick by wrapping glass with paper and placing cut-out silhouettes between glass and paper.
 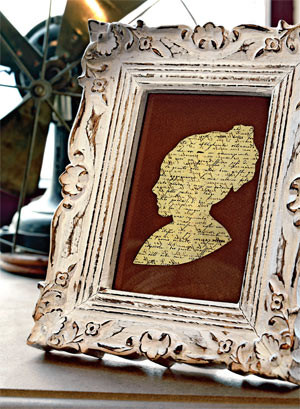 An interesting design idea - “portrait inold frame. To create it, in addition to the finished frame, you will need an old yellowed letter (or its imitation), a portrait of a woman in profile, thick chocolate-colored paper and a sheet of tracing paper. Cut out the silhouette with a sharp mock-up knife (see the job description), then use a piece of paper instead of the cut out piece of paper with a “stencil”. Under the "stencil" place a piece of paper with text. Read further: