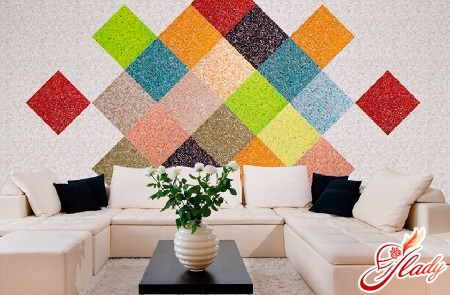
 Liquid wallpaper has literally revolutionizedworld of construction and have gained popularity among many. Those who have already encountered them will list their advantages for a long time: they are beautiful, environmentally friendly, easy to care for, and very practical. But often, when it is necessary to change the environment, preference is given to old paper wallpaper, and only because few people know how to glue liquid wallpaper. However, do not be afraid, everything is much simpler than it may seem at first glance.
Liquid wallpaper. What is it?
Before we move on to the section where we will tell you,how to properly glue liquid wallpaper, let's first find out what it is, what are the advantages and whether this type of building material has any disadvantages. Liquid wallpaper is more like sawdust or flakes in its structure. They are not sold in rolls, as we are used to, but in polyethylene bags weighing from 1 kg. Such wallpaper contains natural cotton or cellulose fibers, dyes, adhesive and acrylic components. There are also a lot of additives, such as silver or gold threads, quartz chips or mica. After covering the walls with liquid wallpaper, the surface becomes pleasant to the touch and is a seamless coating with a thickness of up to 10 mm. When the wallpaper dries, it resembles polystyrene foam in its structure: the surface remains rough and soft. There are several types of liquid wallpaper, differing in texture after application: some are smooth and thin, others are more like fabric with a noticeable relief.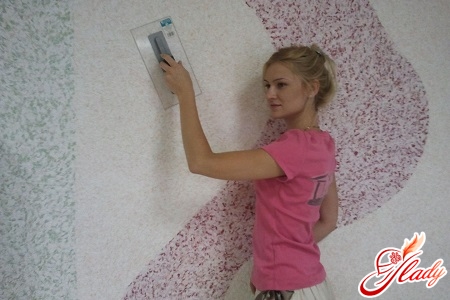
Advantages of liquid wallpaper
- They have antistatic properties and do not attract dust to themselves. They help create a good microclimate in the room.
- They are universal. Can be used both for finishing the corridor and bathroom, and for the living room or children's room.
- You can apply for finishing the apartment in a new building. Are not afraid of shrinkage and do not deform during operation.
- Capable of hiding small wall defects. In addition, they have no seams and give any surface an ideally smooth look.
- The material allows you to breathe walls and at the same time perfectly absorbs sounds.
- Glue on any surface
- Quickly restored if necessary. A damaged area is not an occasion to start a new repair. It can be removed by simply soaking with a spatula. In place of the old piece is easily applied a new composition, and you again have the perfect repair.
Disadvantages of liquid wallpaper
Yes, there are some disadvantages. But they are so minor that they can be considered insignificant, these are:
- High cost of material.
- Lack of moisture resistance.Liquid wallpaper is washed off with water, so you should be careful if you use it to decorate your bathroom or decide to wipe it with a damp cloth to keep it clean. You can, of course, cover it with a protective varnish, but then you will no longer have "breathing" walls.
How to glue liquid wallpaper?
To begin with, it is worth noting that a package weighing 1kg is enough for about 5 sq. m. of wall. The first stage is practically no different from the procedure that we perform before pasting paper wallpaper. We are talking about preparing the walls. We remove all remnants of previous repairs and metal objects from the wall surface, if any. If your wall has its own unique shade, you will have to get rid of it with enamels, primers and other construction tricks. If the wall cannot boast of an ideal surface, it is best to soak it with a FG solution or any other impregnation. If you do not plan to have yellow spots, the constant companions of old apartments, then it is better to pre-paint the walls with white water-based paint. Wooden surfaces can absorb excess moisture, so before applying wallpaper to them, make sure that they are thick enough and do not deform during the application of the wallpaper. Preparing liquid wallpaper for application to walls Take a suitable container and pour warm water into it according to the instructions. Add the dry mixture in small portions and mix thoroughly with a drill mixer. The finished wallpaper is similar in consistency to thick sour cream. If there are any poorly mixed parts left, it is better to remove them immediately. After mixing, leave the wallpaper for 20 minutes, then mix it again. Important: the prepared surface must be covered in one go, so prepare such a quantity of the mixture at once that it will be enough. Applying liquid wallpaper to walls You can find a lot of videos where they will show you how to glue liquid wallpaper, but we have prepared a short instruction for you that will definitely be useful. What you will need:
- Large capacity for dilution of the mixture;
- Roller or spatula for leveling the wallpaper;
- Pulverizer (you can do without it);
- Roll-knurl for giving relief (if necessary);
- Finishing coating.
Take a little of the mixture and use a spatuladistribute it over the surface. The wallpaper is glued tightly, there should be no voids or bulges underneath it. Having smoothed the first portion over the wall, apply the second one, just make sure that there are no noticeable boundaries between them - each portion should smoothly flow into the next one. If you are not satisfied with the result and you have a bald spot or, conversely, a lump, try to eliminate the defect by slightly wetting the wallpaper, and then fill the area with the mixture again and smooth it out. Do not get carried away with corrections, after the third wetting the wallpaper will become unusable. The speed of applying wallpaper to the wall increases significantly if you use a special gun - hopper. Another important point: applying liquid wallpaper to the wall should be done at a temperature of at least 10 degrees Celsius. In this way, we use up the entire mixture and, after the walls are completely processed, let the wallpaper dry. This usually takes from 12 to 72 hours, depending on the level of humidity, ambient temperature and brand of material.


