Text: Tatiana Gagarin. Photo: © JAHRESZEITEN VERLAG. If the apartment has a large room, it can be divided. To do this, the easiest way to install a partition on the basis of a metal or wooden frame, sheathed with plasterboard sheets.  Partitions in the apartment
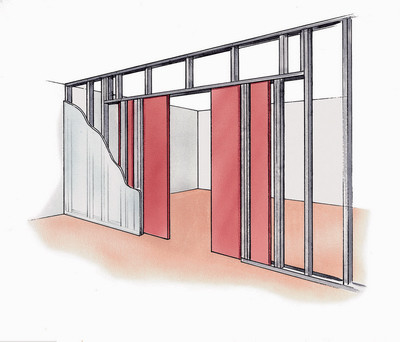
 Room size before redevelopment: 6 x 4.2 sq.m. The partition divided the space into two equal parts: 3 x 4.2 square meters. In the family, which will be discussed today, there are two children: a ten-year-old girl and a four-year-old boy. Each of them has its own life rhythm, daily routine, interests and responsibilities. So that the small inhabitants, even if a spacious nursery, needed personal territory. Mom and Dad did not postpone the "settlement of boundaries" until the next major overhaul of the apartment and turned to the designer for advice. However, they expressed two wishes. Firstly, it was important that the construction work did not damage the existing "finishing" finish. Secondly, parents did not want to separate children with a blank wall, equipped with a standard hinged door. Moreover, part of the precious area would have to be given for its opening. The designer proposed to build a plasterboard partition with sliding doors that, when opened, are removed into the interior of the structure. The width of the opening can reach 180 cm, and the width of the valves can vary between 61–98.5 cm (in our case, these are 150 and 73.5 cm, respectively). The ceiling height is 3 m. For the construction of partitions, we chose the Knauf complex system. The frame is mounted from PN 100/40 guiding profiles and PS-100/50 pillar profiles. The doorway is organized using PP 60/27 ceiling profiles. Sheathing of the partition is made of two layers of drywall. The total thickness of the created “border” was 15 cm. Installation of the structure was carried out using the “dry” method. The only “wet” operation is mixing and applying putty for sealing the joints, strengthening the corners and gently leveling the surface of the plasterboard. It remains to add that the kids really liked the idea of dividing one big room into two small rooms. Now, the little brother can have fun playing her half while her sister prepares school assignments or plays music. The estimate for the construction of plasterboard partitions with sliding doors PartitionUn. rev. Quantity Price, rub. Cost, rub. Guide profile PN 100/40, 3 m pcs. 4 115 460 Profile rack PS 100/50, 3 m pcs. 10 145 1450 Profile ceiling PP 60/27, 3 m pcs. 16 79 1264 Sealing tape pog. m 15 80 1200 Drywall 3000 × 1200 × 12,5 mm pcs. 10 275 2750 Acoustic Butts Mineral Slabs (Rockwool, Denmark) m3 0.76 1827 1390 Edging profile for door opening pog. m 5.5 200 1100 Dowel "K" 6/35 (d = 35, L = 35 mm) pack. 1 210 210 Self-tapping screw TN 25 pack. 2 39 78 Building adhesive tape roll 1 50 50 Putty "Fugenfüller" ("Knauf", Russia) package 1 300 300 Primer "Tiefengrund" ("Knauf") bucket 1 260 260 Eco-Joker paint (Tikkurila, Finland) of the bank 2 , 7 l 2 750 1500 Installation of a partition m2 12.6 400 5040 Preparation of surfaces for painting m2 25.2 130 1625 Painting m2 25.2 160 4032 Sliding doors Wooden base pog. m 1,5 98 140 Suspended roller system SCK 35, (Mepa, Turkey) for sliding frameless doors set. 1 1480 1480 Door leaves 2000 × 800 × 28 mm pcs. 2 1395 2790 Paint "Empire" for furniture (Tikkurila) Bank 0.9 l 2 200 400 Installation of the system of hanging doors sets. 1 800 800 Door color m2 6 160 960 TOTAL 29279 Installation of the main frameConstruction works begin with the preparation of the place where the partition will be. The floor is covered with a protective plastic wrap so as not to scratch the wooden covering. On the walls and floor mark the installation line frame. This is done with the help of a lashnuavtomat (cord-breaking device), plumb line, tape measure and other special devices. The result is the exact thickness of the septum, as well as the coordinates of the opening and racks.
  1
1 2
2 3
3 4
4 5
5 6
6 7
7 81. Заготавливают элементы требуемой длины. Чтобы стоечные профили легко входили в направляющие, длина стоек должна быть на 1 см меньше высоты помещения. Для раскроя используют ручные ножницы по металлу. Работают осторожно: срезанные кромки очень остры! 2. На наружную поверхность стенки направляющего потолочного и напольного профилей (ПН), а также стоечных элементов (ПС), прикрепляемых к стене, наклеивают уплотнительную ленту или герметик. Это позволит предотвратить распространение структурного и ударного шума и компенсировать небольшие неровности пола Затем, ориентируясь по разметке на полу, направляющие профили дюбелями крепят к полу3. Следующий шаг – возведение общей рамы. Стоечные профили вставляют в направляющие, выравнивают по отвесу и дюбелями прикрепляют к стене. Совет: работа пойдет быстрее, если предварительно выполнить в профиле отверстия под крепеж. Расстояние между дюбелями – не менее 100 см 4. Потолочный направляющий профиль крепят так же, как напольный 5, 6. Монтируют промежуточные стойки (с шагом не см – для обеспечения устойчивости конструкции), а также балочного направляющего профиля (ригеля) над дверным проемом. Ригель крепят к стойкам каркаса и подвешивают с помощью коротких стоек к потолочному ПН. Для соединения металлических деталей рекомендуется использовать специальный инструмент – просекатель7. Чтобы не испачкать стены и потолок при шпаклевке и окраске обшивки, базовые поверхности вокруг профиля закрывают строительным скотчем 8. Уровнем выверяют горизонтальное положение балочного профиля ПН Монтаж основного проемаТеперь необходимо смонтировать конструктивные элементы пенала для раздвижных дверей.
 1
1 2
2 3
3 41 A wooden support (from three bars of solid or glued wood) for a sliding door system (how to prepare the system itself, will be discussed below) is mounted on the girder deck. The element eliminates the non-parallelism of the floor and ceiling, and also reduces the vibration during the movement of cloths. The horizontal position of the wooden base is controlled by level 2. Now set the composite profile, limiting the position of the door leafs. To do this, on the outer side of the shelves of the monitors fasten two racks of the ceiling profile PP 60/27. Next, finally attach the wooden support to the beam PN 3. The frame is sheathed with plasterboard. The distance between the points of fastening is no more than 250 mm. Sections are treated with edge planer. The free space of the partition wall is filled with mineral wool (to increase sound insulation) 4. Mount the trim which will hide the mechanism of sliding doors. Platbands are usually made of edging plasterboard profile. Installation of doors. As panels of the system of sliding doors, painted panels of coniferous wood are used (their thickness is 28 mm). In our case, the selected system on the upper suspension (guide rail) - a profile with curved shelves, inside which the carriage moves with two rollers.
 1
1 2
2 3
3 4
4 5
5 6
6 7
7 8 1, 2. Prepare a wooden base, guide rail and door leaves. First, determine the ratio between the width of the opening and the width of the door. On the basis of making marks indicating the line of cut of its lower bars. If necessary, the basis is shortened from both ends. In our case, the cut is made on the intended markup3. At the open ends of the wooden base put the plugs - restrictive wooden pads 4, 5. The guide rail of the sliding door suspension system is adjusted to the size of the door (shortened with a hacksaw). Then it is inserted into the prepared wooden base 6–8. Mount plastic supports (suspension) for the suspension system. In the guide rail insert the carriage (two on each sheet) with two rollers. Next, hang the door and adjust the mechanism of the suspension system. At the ends of the guide rail mount the elements to ensure safe stopping of canvases.