Create a New Year mood, decorate the house andinteresting to spend time - you say, impossible? Execute, and we will prove it. Together with her daughter, we will show you some winter hand-made articles that can easily be built even with very small children. From the simplest materials we will make a Christmas tree toy, a postcard for a beloved grandmother and a garland. By the way, my daughter Varenka is two years old. And she was all right.
Christmas tree toy
 Photo: Olga AlexandrovaShrough the reservation: doing with the child does not mean doing everything for him. Let the kid try to participate in all the stages of making toys: mixes the ingredients, rolls them, cuts them out and colorizes them. Let it not be too neat, but the pleasure and benefit for the baby from the process will definitely be greater. To begin, we prepare the mass for modeling. There are two simple options. Salted dough Ingredients: a glass of flour, half a cup of shallow salt, half a teaspoon of citric acid, a teaspoon of vegetable oil. How to do All the ingredients are mixed and properly mixed. Then warm up in a pan. During heating, the mass will become more dense and it will easily move away from the bottom of the frying pan. If you overdo it and overheated the dough, you can just knead it again with wet hands. If desired, you can immediately divide the dough into several parts and add food colorings. If all the dough is not used up at a time, then it will be perfectly preserved until the next time in a tightly closed jar.
 Photo: Olga Alexandrova2. Cold porcelain Ingredients: half a glass of cornstarch, a glass of baking soda, 140 ml of cold water. How to do: Mix all the ingredients in a saucepan and heat to a light fire, stirring constantly. Wait until the mass becomes homogeneous and very dense. After the dough cools, it must be well kneaded. While cooling, it can add dyes. "Porcelain" is more plastic and durable than the dough. Therefore from it it is possible to do more thin and graceful things.
 A photo: Olga Aleksandrova So, the mass is ready, you can roll it out. It is very fascinating and useful for small motor skills. We used a rolling pin with embossed patterns that make the texture of the toy even more interesting. If your child is older than 2-3 years old and cut figurines with ready-made molds, he is bored, suggest him to blind any toys - just what he wants. Are the figures ready? We leave them for the night alone - freeze. Dry this dough in the oven is not worth it, it can crack. And do not forget to make holes in them, so that you can thread the thread and hang it on the Christmas tree. Layfak: if the toys are immediately put on wooden skewers, they will be much more convenient to paint.
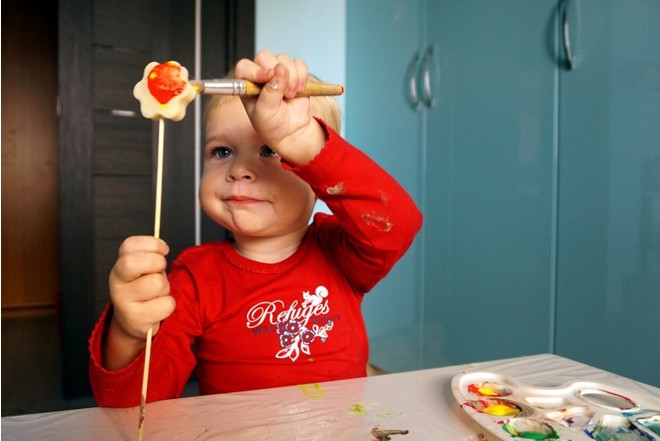 A photo: Olga AlexandrovaWhen the toys dried up, we took paints, brushes and started to create. It is possible to coat a toy with randomly colored strokes - literally to slap. And you can draw all the details in your jewelry. Everything depends on the age and perseverance of your artist. While the paint is not dried, you can sprinkle the toy with sequins - it will be even more elegant. We used velvet pollen for scrapbooking. Lifshak: for a toy to last a long time, it can be varnished. It is very convenient to use a spray varnish.
Postcards for grandmothers
 A photo: Olga AleksandrovaResovanie on a stencil - an easy way to involve the creativity of the youngest members of the family. The stores are full of different options. But you can also make the most basic workpiece yourself. We are painting on a thick sheet of paper the silhouette of a Christmas tree with a star on the vertex, cut it out along the contour. We put a sheet of watercolor paper under the stencil and fix the workpiece with adhesive tape on the table. Instead of plain paper, you can use multi-colored or dense cardboard. Then you can not interfere - let the child color the workpiece, as he pleases. Excellent watercolor or acrylic paints, gouache or pastel crayons. Laifak: Varyushka used watercolor pencils. Their feature is softness. If desired, you can blur their traces with a wet brush or shade with a regular piece of paper.
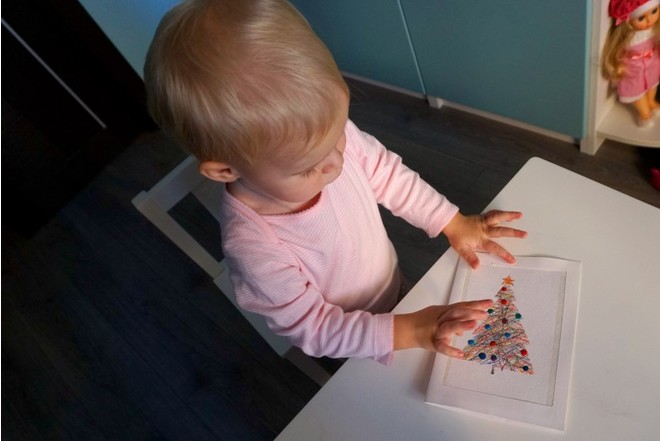 A photo: Olga AlexandrovaProtsess so captivated daughter, that instead of one Christmas tree, we painted four at once. The finished tree was decorated with colorful balls of plasticine, which Varya gladly attached herself. Then I made the simplest piece for a card from coated paper. On the cover a window was cut out, in which a double-leafed adhesive tape glued our Christmas tree. After that, you can decorate the card with stickers, artificial snow, beads. And if the age and skills of your baby are allowed - to sign it as a gift to your beloved grandmother. Layfak: if the child is still young, you can give him a pencil, take his palm, and together bring out the name of the donor.
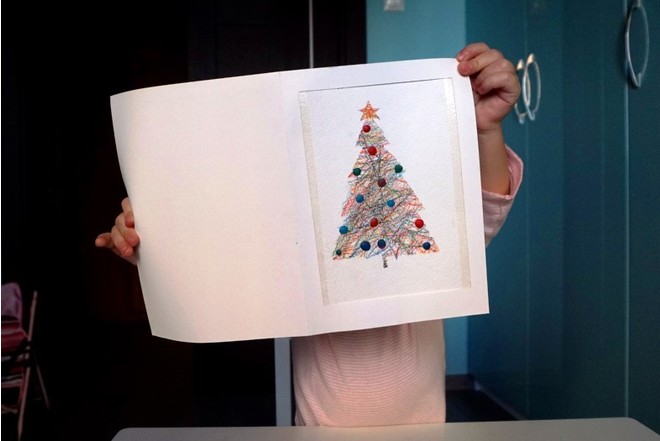 Photo: Olga Alexandrova
Multicolored garland
You can make a garland from ready-made coloredpaper or sheets with a New Year's pattern. But then you will deprive the baby of the most interesting thing. After all, all children love to paint with paints only understandable dots and squiggles. I gave my daughter several ordinary album sheets, brushes and a palette with multi-colored gouache. After 15 minutes, the sheets were no longer white, but covered with unique patterns. Do not be embarrassed if there are white spots and voids on them: in the overall weaving, this will not be noticeable. Life hack: if you are not afraid to trust the child with scissors, let him cut the colored paper into strips himself. Just mark the lines on it - it will be easier for him. A photo: Olga Alexandrova Our next helper is a glue pencil. Let the kid try to glue the strips themselves into rings, connecting them to each other - as links in a chain. Lifshak: if the garland of ordinary rings seems boring to you, try simply sticking the strips with the tips inwards - so that the hearts will turn out.
 Photo: Olga Alexandrova Also interesting: