Tree-ball
 Artificial Christmas trees Materials:
- pine twigs
- green wire
- small ceramic pot
- oasis
- ball of small diameter (oasis)
- Physalis boxes
- branch diameter 2–3 cm
- moss
- floral studs
Tools: hacksaw, scissors, knife
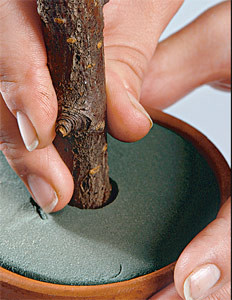
Cut off the excess from a piece of oasis so that it fits tightly into the pot. Insert the oasis inside. For better stability, you can put a few stones in the bottom of the pot.
Cut off a piece of the required size from the branch– the finished tree should not look "leggy". The length is calculated as follows: the height of the tree trunk (from the "ground" to the crown) plus about 10 cm to deepen the branch into the oasis. If you are making a larger tree, the reserve should be larger. Secure the branch in the oasis.
Carefully place the ball base on the other end of the branch. For strength, the end of the branch can be coated with glue, such as PVA.

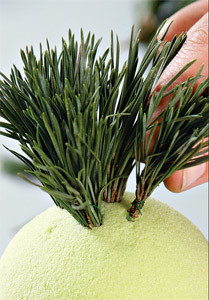
Prepare the pine needles - gather them into bunches, wrapping the ends with green floral wire. The tops of the branches can be used whole, without separating them into individual needles.
Begin to fasten bunches of pine needles from the top of the ball-base, sticking them into the oasis. Spiral evenly, filling the ball with beams tightly enough.
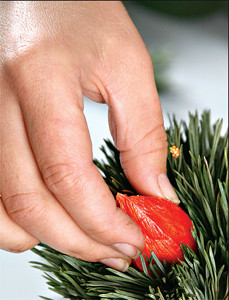
Place the needles evenly between the bundles.physalis boxes, securing them to a piece of wire. Bright "lanterns" should peek out from the dark needles. Having filled the entire surface of the ball, decorate the base of the tree - secure pieces of moss to the oasis using floral pins.
Christmas tree of peppers
 Materials:
- pods of red hot pepper
- thin rope of natural color
- long floral studs
- finely chopped corrugated paper green
- base cone (oasis)
- green wire
Tools: scissors
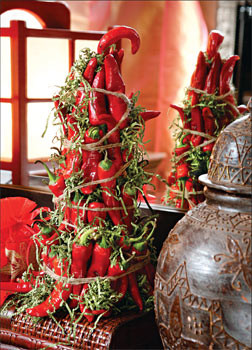
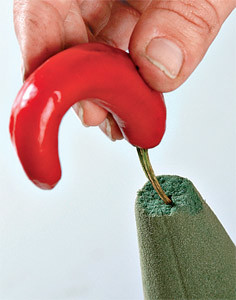
Select a curved pepper pod, secure it to the wire and insert it into the top of the cone.
Place the pepper pods on the surface of the cone,moving from top to bottom. Temporarily secure the pods with long pins. When buying peppers, choose either small pods or irregularly shaped pods. Small ones will fill the surface of the cone more densely, and curved ones will resemble spruce branches.

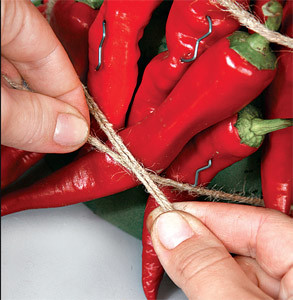
Fold a thin rope in half and wrap it tightlyher finished tree from top to bottom, pressing the tiers of peppers to the base. Secure the rope with a nice knot, cut off the long ends. Now you can remove the fixing pins.
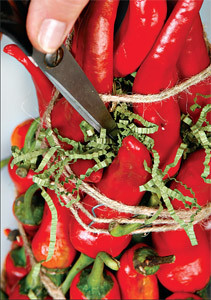
Place bundles of corrugated paper in the spaces between the pepper pods - it is easier to place them if you use scissors, for example.
Christmas tree of leaves
Materials:
- base cone (oasis)
- skeletal leaves
- thin satin ribbon in tone with leaves
- floral studs
- tailor pins
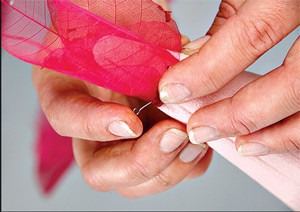
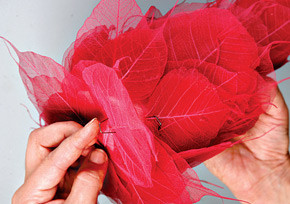
Place the leaves on the base of the future treestart from the top down - first, attach several small overlapping leaves to the top of the cone. Secure the leaves to the base with tailor's pins at two points at the bottom of the leaf. Select leaves without defects for this work. Fill the entire surface of the cone with them, moving in a spiral. Periodically change the direction of movement (clockwise and counterclockwise), then the tree will be fluffier. Having filled half of the base, begin to attach two, and sometimes three leaves, folding them together. Slightly shift the leaves relative to each other. Secure these leaves to the base with pins. Secure them so that they do not adjoin the surface of the cone, but lag behind it - the tree will be airy.
After fanning two or three leaves, secure them with a pin to the "base" of the cone. Repeat so that the tree ends up "standing" on the leaves.
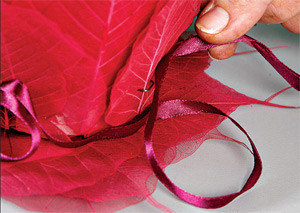
Pin a thin satin ribbon, positioning it so as to hide the pins that hold the lower leaves in place. Secure the ribbon with loose loops.
Christmas tree with cones
Materials:
- Pine cones
- green coconut fiber
- base cone (oasis)
- floral studs
- green floral wire
Tools: scissors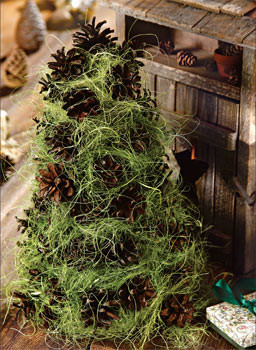
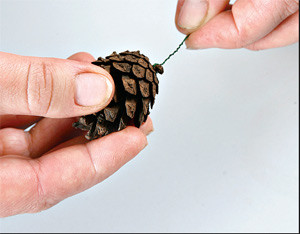
Cut the wire into pieces and wrap them around the ends of the pine cones. Each pine cone should have a stiff wire "stem" AB about 3 cm long.
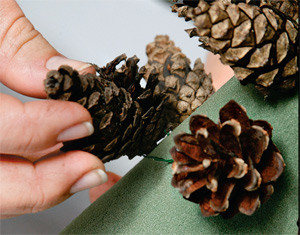
Align the cones evenly on a tapered base. Also fasten the cone on top of the cone.
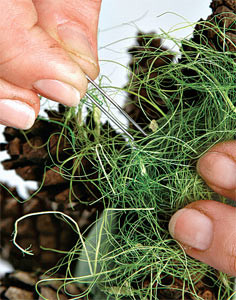
Pave the gaps between coconut budsfiber. At the bottom of the cone fiber fasten floristic hairpins. When the entire space is filled with scissors or a thin stick (brush) distribute the fiber so that the cones are clearly visible. Scales of cones keep the fiber in place, and the elastic filaments will not allow, in turn, fall out of the cones.
Comments
comments