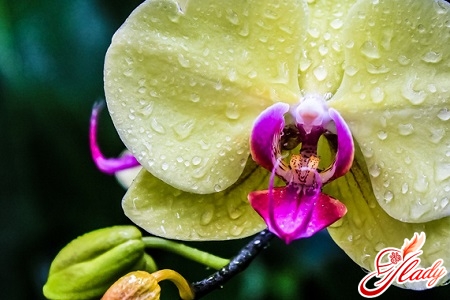
The phalaenopsis orchid is considered one of the mostunpretentious species of domestic orchids. But this does not mean that she does not require care, is not sick and does not act up. Like all green pets, an orchid needs care and attention. It is mistakes in the care most often cause all sorts of ailments of this plant. For example, if the orchid is not transplanted on time, the plant will begin to ache, die and even die. Of course, the most deplorable result of such mistakes of owners happens very rarely - after all, the plant will try to survive in any conditions. But the loss of decorativeness, lethargy and poor health of the plant will be ensured. Therefore, the phalaenopsis orchid should be transplanted periodically. And in what cases and how exactly it should be done, we will try to find out with you.

Reasons for transplantation
The phalaenopsis orchid has a very powerful roota system that, in addition, is growing rapidly. And it is she who becomes the guide that helps to determine that the plant needs a transplant. The reasons for the transplantation of phalaenopsis orchids are only two: the volume of a flower pot that has become insufficient and various damage to the root system. Insufficient pot size If the pot becomes small for an orchid, it must be transplanted into a larger container. How to determine that the orchid has outgrown its pot? After all, its roots are already partly above the ground surface. By the way, the roots growing above the ground are just an indicator of the normal development and good condition of this flower. So the indicator of the fact that the pot became small to the plant becomes such a powerful development of the root system, in which it almost completely fills the pot and displaces the substrate from it. In this case, for a transplant, I choose a pot a little more than the previous capacity, and the transplant is carried out only after the flowering of the orchid. Damage to the root system Various damage to the root system of phalaenopsis orchids can be caused by mistakes in care. For example, if the flower does not have enough moisture, its roots dry up and die. With excessive watering and stagnant water in the pot, the roots, on the contrary, start to rot and die. By the way, the reason for the dying off of the roots is also the incorrectly chosen substrate. But it is the excess moisture that the plant suffers with difficulty, like any other epiphytes, having air roots. So, the dying off of the roots for one reason or another is the second necessity of transplanting phalaenopsis orchids. Note that this state of the plant can be called critical. And in this case, he needs an immediate transplant.
Choice of flower pot and soil
Initially, for the cultivation of phalaenopsis orchidsyou must choose transparent flower pots. First, it will allow to monitor the state of the root system of the plant, and secondly, in the light the roots of this flower develop better. Therefore, plant and transplant the orchid in plastic transparent pots. By the way, from such a pot the plant is then easier to extract, without traumatizing its root system. At the next orchid transplantation (when it overgrows its pot) take a container, the diameter of which is two to three centimeters greater than the diameter of the old pot. If you make an emergency transplant, you can place the orchid in the previous pot (pre-treated and disinfected) or take a container of the same volume. As for the soil, for phalaenopsis orchids take a special floral substrate or make soil mixture yourself. A primer suitable for growing a flower is a mixture of moss (sphagnum), perlite, charcoal and wood bark. The proportions of the constituent substrate depend on the conditions of the plant's content. In apartment conditions, where air is usually dry, moss should make up a third part of the substrate, as this material absorbs moisture well, and then saturates the roots with it. If the humidity in the room is high, sphagnum is added to the substrate in a minimal amount. In fact, it is quite difficult to formulate a soil mixture for phalaenopsis orchids - it requires some experience. And if this experience you do not have, then get ready ground, designed to grow air orchids (epiphytes). 
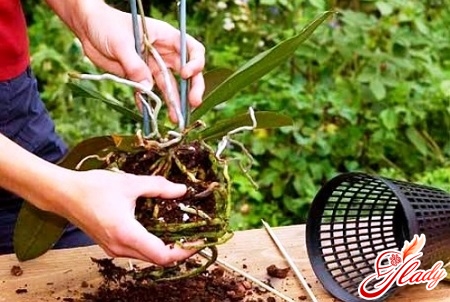
Transplant process
Whatever the cause of the transplantation of orchidsphalaenopsis, this process requires mandatory processing of the roots (the most vulnerable part of the plant). To begin with, the flower needs to be removed from the old pot. To do this, the substrate must be well moistened, the pot must be crushed, and then, tapping on the bottom of the pot, gently pull the plant. After that, you need to shake off the roots of the old earth, wash the roots with warm (not hot!) Water and carefully examine them. If during the inspection you find (and this is most likely to happen!) Rotten or dried roots, and also completely dead roots, they must be removed. Damaged roots and their parts are cut with sharp disinfected scissors or a knife, and then I process the places of cuts with crushed coal and dry them. If the transplant is carried out because of severe damage to the roots, then cut off a lot of sick and dead roots. This procedure is necessary, although after it the plant is restored for a long time. But with proper care, you will be able to save your orchid. So, the process of transplantation is as follows.
- The pot intended for transplantation is filled one third with a fresh substrate, laying the drainage layer on the bottom.
- Yellowed and wilted leaves are removed, making a longitudinal incision and pulling parts of the leaves to the sides.
- On the substrate, carefully place the roots of the orchid and sprinkle them with soil from above and along the sides, filling the voids between the roots.
- The roots are pressed gently (with a little effort), and the earth is poured on top.
- Roots that do not fit into the pot are left above the ground surface, making sure that the growth point and the lower leaves are not covered with earth.
- When transplanting plants with most of the cut roots, the plant strengthens the soil with wooden sticks, so that the flower does not fall out of the pot.
- Pot with the plant put in a place protected from direct sunlight and watered two or three days after the transplant.
Now you only need to provide your phalaenopsis orchid with the right care.
Post-transplant care
The main thing is to closely monitor the transplantedplant. After the next transplant, plants tend to feel good and thankfully respond to new conditions with intense growth. If an emergency transplant was performed, the orchid will recover and adapt for some time. Such a flower can be covered with a transparent hood or placed in a plastic bag to provide the weakened plant with sufficient moisture. Periodically, the orchid needs to be ventilated, but protected from direct sun, drafts and temperature changes. In the case of transplanting a healthy plant, special conditions for it are not needed. After the first pause (two to three days after transplantation), you should return to the normal watering regime, and as soon as the flower grows, feed it once (every second watering) with a complex or special fertilizer. And in the rest, take care of the transplanted orchid, adhering to the usual rules. If you closely follow your phalaenopsis orchid, properly take care of it and manage to transplant it in time, then it will respond to you with gratitude - its wonderful flowering. And the rules of care and transplantation are not so complicated, so it will be easy to observe them. Good luck!