


 Imagine what you see in front of youa woman with beautiful features, with laid hair, in good, expensive clothes. And then you pay attention to her hands and notice that the nails are not well-groomed. Immediately smiled all the positive impression. And indeed, so it really is - a modern woman should be perfect in everything - from the hair on her head to the tip of her fingernails. But, often the reason for the lack of proper nail care is not laziness or even lack of a sense of taste, but the usual catastrophic lack of free time. Today, a new generation of care for the hands of the house, in particular for the nails, has come to help women, which helps to simplify this process, but also save considerable time for subsequent manicure procedures. So, the most popular in recent years has acquired the procedure of nail extensions at home, which allows women to simplify the care of their own nails. In addition, owners of weak nails from nature, can now safely realize their dreams and build up an elegant manicure. Also, with the help of build-up, it is really possible to achieve a well-groomed kind of hands, which will add a certain zest to the image of a modern successful woman. But, just as beauty requires sacrifice, and self-care procedures require substantial material costs and a lot of free time. In practice it turns out very differently. Money is not enough, and there is no time to go to the master to maintain the nails. Therefore, many girls and women have gone to drastic measures - they want to learn how to grow their nails at home. Naturally, for many, nail extensions to itself, seem like a crazy idea. But this opinion will only be for those who simply do not know how to learn to do it. But persistence and persistence always led only to victory. Therefore, having spent time and effort, having "overshadowed" a lot of women's magazines and illustrations, having visited the master classes on nail extensions, you will become yourself a master and you will be able to indulge in indescribable beauty on your hands. Our recommendations will not be superfluous in your endeavors.

False nails - as the simplest option
The fastest and most economical option to learnmaking hands beautiful are false nails. To do this, it is enough to buy artistic tipsy, complete with which there is a special glue. To understand how to properly nail the nails themselves will help learn the instruction with elementary recommendations. Bear in mind that not carefully glued nails will look completely aesthetic and not natural. In addition, tipsy have a standard form that can not be changed. Most often they do not have a picture, but even if there is one, then it does not differ in fantasy and individuality. The set of false nails consists of ten plates. The procedure for their gluing requires a certain skill. Therefore, you will have to try to stick the tips straight from the first time, since the glue has the ability to dry almost instantly, deforming the native nail at the same time. Such experiments often lead to the fact that the nails have to be treated. But if everything is done correctly, such troubles can be avoided. The first step to the overhead tips will be parting with the length of your own nails. Remember that on the long native nail the overhead tipa will not last long. The second step is the removal of old nail polish, cuticles and burrs from their nails. Nails should be filed, and wash hands thoroughly and wipe dry. Next is the selection of false nails separately for each finger. On each plate, apply a little glue and spread it over the entire surface. To adjust a plate to a native nail it is necessary accurately, but it is strong, holding approximately 10 seconds. As soon as you feel that the nail is well kept in its place, immediately remove excess glue, which necessarily protrudes from under the plate. After all the nails are glued, you can cover them with your favorite varnish. You can remove the false nails yourself using acetone or a nail polish remover, a drop of which is applied under the plate. To lift a plate it is necessary by means of a special stick for manicure.
We build nails with acrylic
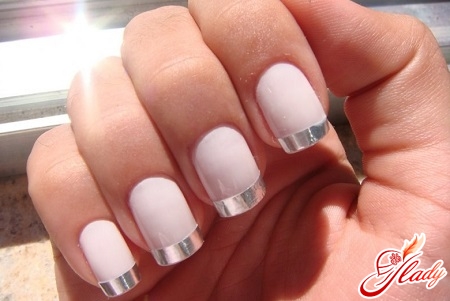
Acrylic is the result of the combination of powder and liquid. The history of acrylic began in dental offices. In the world of cosmetology, he came just recently. Acrylic nails can be created both with the help of special forms, and based on tips. Nails, accrued on the forms, are formed directly from the polymer material. Plus this technique - is to protect your own nails from the influence of harmful external factors, the long-term and strength of the material. Acrylic nails can last you about 4 months. By cons are minimal toxicity and quite unpleasant odor during the formation of nails is not yet frozen mass. After drying, the smell disappears. Acrylic nails can be easily grown on their own even at home. Our recommendations will help you with this. Prepare all the necessary materials in advance. These include: dry acrylic powder, solvent, liquids for degreasing surfaces and for coupling of native and artificial nails, brushes and nail files. The entire set of such materials can be selected and purchased at the nearest specialized store. This purchase will facilitate your wallet by about $ 100, but these materials will suffice for many subsequent corrections carried out at home. If you calculate, how much would you cost such procedures, conducted with the help of a master, then the amount would increase two times. Before growing nails, thoroughly disinfect the hands. Do a manicure with your own nails and shorten their length. The surface of the nail should be ground with a special nail file, and after removing the formed dust both from the surface of the nail and from the depressions around it. Further on the nail it is necessary to apply a preparation which is responsible for its or his clearing, and to allow to dry out a little. Next comes the form itself - it needs to be carefully installed and glued together, to create the future nail. Select a small glass container, pour in a little liquid and dab a brush and squeeze it, but so that it becomes almost dry. With the help of this moist brush, dial a small amount of camouflaging powder, which as a result should be converted into a prickly ball. If the mass is damp, then it will be almost impossible to work with it. After the ball is impregnated with liquid, apply it on the pre-set form. By rolling it on the surface of the mold and at a short distance from the cuticle (1 mm), try to create the necessary shape for the future nail. In this way, continue the procedure of building up until you get the expected result. With the help of acrylic, you can build nails a-la naturelle (French manicure), but for this you will need to use white and pink acrylic powder. In addition, when using multi-colored powder, you can create all kinds of fantasy drawings of any complexity, as well as complement them with acrylic paints and various accessories. When the procedure is complete, use tweezers to carefully remove the molds, polish the nail file, sand and polish all the artificial nails. If you build acrylic on tipsy, nails will be given a very neat appearance. In addition, this procedure will prevent them from peeling and brittleness. To do this, it is necessary to shorten your own nails very shortly, to cut their surface, to prime them, to select and glue the suitable tips. In order to shorten the tips to the desired length, you need to buy special cutters. Cropped tipes need to be given the desired shape and polished its surface. Next follows the immediate acrylic build-up of the above technology. After the nail grows (about 2 weeks), you need to make a correction. To do this, you need to cut the zone between the artificial and natural nail, and also slightly to finish the nail with the remaining surface. If necessary, you can cut down the excessive length of the artificial nail. Using a degreaser and a coupling liquid, treat the work surface, avoiding contact with the mucosa and cuticle. Further on the above scheme, lay the acrylic on the surface of the nail, modeling an exact copy of the shape of the native nail plates. Wait until the material dries, and then saw the surface. After that, polish the nail until a smooth and brilliant result is obtained. Do the same procedure with all the other nails. 
We increase nails with gel
Method of nail extensions with gelis very popular. All this is due to the semi-synthetic and natural components, which are used directly to build up the nail plate. The most used material was coniferous resin. This method has positive aspects, namely - no harm is done to human health, in addition, the components of the gel have antibacterial qualities. Also as a result of gel build-up, nails have a very natural appearance. Quite recently, innovations were introduced into this technique in the form of placing under silk fabric tips. Such know-how helps to further strengthen the nail and speed up the very procedure of building. Using the gel allows you to apply for the decoration of manicure all sorts of materials such as - beads, crystals, colored foil, etc .. The main thing - your desire, perseverance and imagination. The result is beautiful nails built with your own hands. The method of nail extensions with gel has several negative aspects. The first is high prices for materials. The second - the breakage of such a nail requires a complete replacement. Despite everything, it should be remembered that no interference in the natural processes of the human body does not pass without a trace. At best, you will get a small microtrauma of the nail. At worst, fungal and infectious formations at the site of nail damage, which are hard enough to treat and can lead to the destruction and deformation of the nail plate. In addition, if you increase the marigold for a long period of time, it can lead to nail dystrophy. To increase nails with a gel at home, you should pre-purchase saws, tips, liquid-disinfector, primer, bander, gel, brushes, ultraviolet lamp, acrylic paints and brushes for painting. Before increasing your nails at home, make yourself a manicure and shorten the nail plates, leaving only 2-3 mm of their free edge. Then use a saw to polish their surfaces and fix on the right place the shapes for the build-up. Next, apply a small amount of gel to the surface, beginning with half of your nail and extending the shape to the selected length. The resulting layer should be dried a little under the llama and proceed to apply the next, deviating from the cuticle line by about 1-2 mm. Again, there comes the drying sequence under the lamp, after which you need to carefully remove the stencil and give the desired shape to the nail. Next, type a little more gel on the brush and spread it over the nail, starting from the middle in both directions, but so that in the center of the nail a bump appears. After that, you need to turn the palms of your hands upwards, and after a couple of seconds return to the normal position and dry your fingernails under the lamp. The final shape is attached to the nails with a saw. The final stage of this build-up will be opening the nail surface with a very thin layer of gel and drying it under the lamp. It is forbidden to wet your hands for half an hour after the last drying. Correction of gel nails at home is slightly different from the same procedure with acrylic. So, after removing the cuticle, you need, starting with its zone, to remove almost half of the old gel. The visible surface of your overgrown nail should be sawed with a rough file for better adhesion to the new gel. Each nail plate is in turn treated with a liquid for disinfection, with a primer and a bonder, after which it "rests" under an ultraviolet lamp. Then follows the procedure of applying the gel to the overgrown zones in 2-3 layers, drying each under the lamp. After the required thickness of the nail plate has been achieved, the upper sticky layer of the gel needs to be removed with acetone. Form claws need to be adjusted with the help of rough, and then small saws.
How to remove artificial nails at home?
Artificial nails are quite easy to take offyourself. The main thing is not to rip them off with their relatives. To remove acrylic claws you need to have at hand tweezers, acetone, foil and cotton wool. With the help of nippers, shorten the length of the nail plate, and for the remainder of it, put cotton pads, generously moistened in acetone. To avoid intoxication, steam acetone, wrap the finger with foil and wait 10 minutes. After this time, remove the foil and acrylic residues with a soft saw. Removal of gel nails will require some effort, so they need to be cut with a hard file.
Comments
Also read:
 Cosmetic face clay - methods of application and recipes for making masks
 Spring manicure. Spring is coming, spring is the way!
 Manicure on short nails can be stylish!
 How to whiten your teeth at home with folk remedies?
 What should an ideal girl look like?
 Hair ingrown into the skin: it is easier to warn than to remove